Thursday, October 24, 2013

Project 4 - modernization

    We have finished (Caleb and me) our project 4 (modernization)
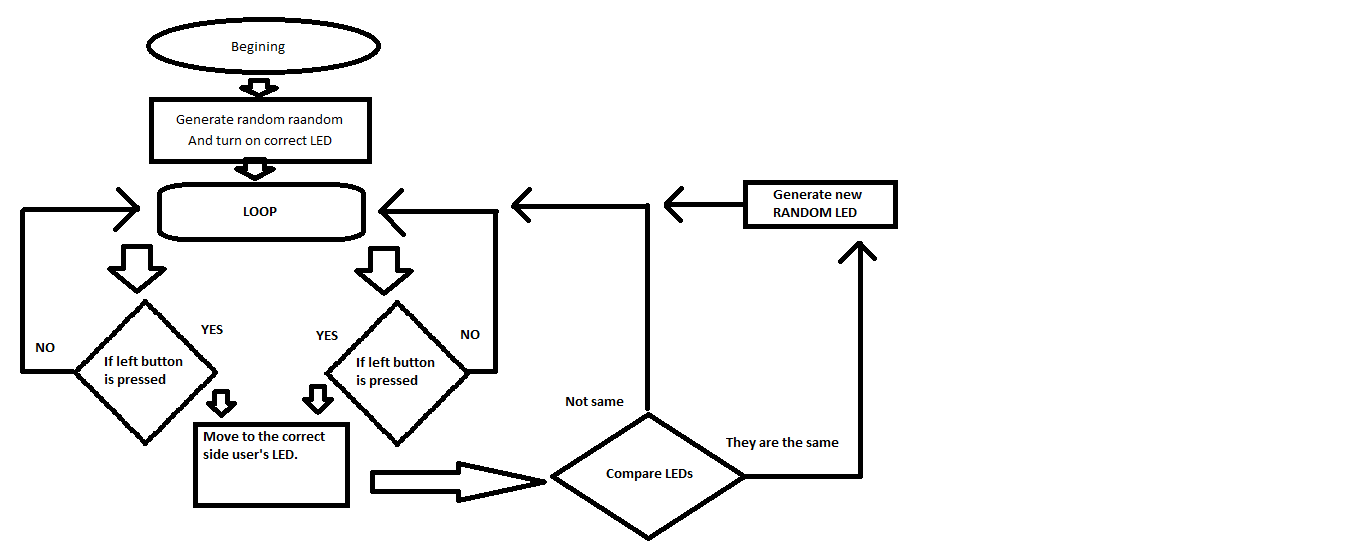
Algorithm: 
   Explonations: Firstly program will generate random number and will turn on LED, next, what will do this program is checking in the loop which button was pressed. Then move users LED to the correct side and compare: are random LED is on the same position with user LED, if yes - generate new random number and change LED.

Sketch:
// Leds for user

#define LEDU1 8 //Left one
#define LEDU2 7
#define LEDU3 6
#define LEDU4 5
#define LEDU5 4  //Right one

//Leds for random
#define LEDR1 13 //Left one
#define LEDR2 12
#define LEDR3 11
#define LEDR4 10
#define LEDR5 9//Right one

#define BUTTON1 3 //left //Buttons
#define BUTTON2 2 //right

#define MinLED (LEDU5)
#define MaxLED (LEDU1)

int posU = 0; //position of user's led
int posR = 0; //position of random's led

void setup()
{
  pinMode(LEDU1, OUTPUT); //SetUp user LED outputs
  pinMode(LEDU2, OUTPUT);
  pinMode(LEDU3, OUTPUT);
  pinMode(LEDU4, OUTPUT);
  pinMode(LEDU5, OUTPUT);
  
  pinMode(LEDR1, OUTPUT); //SetUp random LED outputs
  pinMode(LEDR2, OUTPUT);
  pinMode(LEDR3, OUTPUT);
  pinMode(LEDR4, OUTPUT);
  pinMode(LEDR5, OUTPUT);

  pinMode(BUTTON1, INPUT); // input for the button
  pinMode(BUTTON2, INPUT); // input for the button
  
  digitalWrite(LEDU1, HIGH);
  posR = random(5);
  digitalWrite(LEDR1, LOW);
  digitalWrite(LEDR2, LOW);
  digitalWrite(LEDR3, LOW);
  digitalWrite(LEDR4, LOW);
  digitalWrite(LEDR5, LOW);
  if(posR == 0)
  {
    digitalWrite(LEDR1, HIGH);
  }
  else if(posR == 1)
  {
    digitalWrite(LEDR2, HIGH);
  }
  else if(posR == 2)
  {
    digitalWrite(LEDR3, HIGH);
  }
  else if(posR == 3)
  {
    digitalWrite(LEDR4, HIGH);
  }
  else if(posR == 4)
  {
    digitalWrite(LEDR5, HIGH);
  }
  
  compare();
}

void loop()
{
  if(digitalRead(BUTTON1) == HIGH) //move left
  {
      if(posU == 0)
      {
        posU = 4;
      }
      else
      {
        posU--;
      }
      
      digitalWrite(LEDU1, LOW);
      digitalWrite(LEDU2, LOW);
      digitalWrite(LEDU3, LOW);
      digitalWrite(LEDU4, LOW);
      digitalWrite(LEDU5, LOW);
      
      if(posU == 0)
      {
        digitalWrite(LEDU1, HIGH);
      }
      else if(posU == 1)
      {
        digitalWrite(LEDU2, HIGH);
      }
      else if(posU == 2)
      {
        digitalWrite(LEDU3, HIGH);
      }
      else if(posU == 3)
      {
        digitalWrite(LEDU4, HIGH);
      }
      else if(posU == 4)
      {
        digitalWrite(LEDU5, HIGH);
      }
  }
  //-------------------------------------------------------------
  if(digitalRead(BUTTON2) == HIGH) //move right
  {
    if(posU == 4)
    {
      posU = 0;
    }
    else
    {
      posU++;
    }
    
    digitalWrite(LEDU1, LOW);
    digitalWrite(LEDU2, LOW);
    digitalWrite(LEDU3, LOW);
    digitalWrite(LEDU4, LOW);
    digitalWrite(LEDU5, LOW);
    
    if(posU == 0)
    {
      digitalWrite(LEDU2, HIGH);
    }
    else if(posU == 1)
    {
      digitalWrite(LEDU3, HIGH);
    }
    else if(posU == 2)
    {
      digitalWrite(LEDU4, HIGH);
    }
    else if(posU == 3)
    {
      digitalWrite(LEDU5, HIGH);
    }
    else if(posU == 4)
    {
      digitalWrite(LEDU1, HIGH);
    }
  }
//---------------------------------------------------------------
  compare();
  delay(200);
}

int compare()
{
  if(posU == posR)
  {
    posR = random(5);
    digitalWrite(LEDR1, LOW);
    digitalWrite(LEDR2, LOW);
    digitalWrite(LEDR3, LOW);
    digitalWrite(LEDR4, LOW);
    digitalWrite(LEDR5, LOW);
    if(posR == 0)
    {
      digitalWrite(LEDR1, HIGH);
    }
    else if(posR == 1)
    {
      digitalWrite(LEDR2, HIGH);
    }
    else if(posR == 2)
    {
      digitalWrite(LEDR3, HIGH);
    }
    else if(posR == 3)
    {
      digitalWrite(LEDR4, HIGH);
    }
    else if(posR == 4)
    {
      digitalWrite(LEDR5, HIGH);
    }
    return 1; //return 1 if user win
  }
  
  return 0; //return 0 if user lose
}

Schematic: 

How it works: 

P.S. Sorry for bad quality of video...

Sunday, October 13, 2013

Robotics private top secret chat!

    Hello 2 everyone! I decided to code something interesting for our robotics team and i made private top secret chat. You can download it here. It is very easy to use it!
    After you have downloaded it. Create a directory and put this program into new directory (that's because program will download temporary files and it will make your desktop "dirty"). After that you can open a program. Here you can see main menu of my program:
Pretty easy, isn't it? In main menu you can see 5 options:
  1. Login
  2. Register a new account
  3. Information about program
  4. Options
  5. Exit
First thing, which you need to do - check program for updates! To do that you need to go to the "options" and then press "Check program for updates". 

Then press "1". Program will do everything by itself.


Now you will need to Register a new account, so you will need to press "2" and then "Enter".
And you will see this page:
Here you will need to create your unique account nickname. And later your password and confirmation of it. After you have created a new account you will need to wait for activation (from 1 hour to 1 day).

After activation you will be able to login into the program. Each time, program will check itself for updates.

After authorization you will see..
  1. Chat
  2. Usefull files
  3. Options
  4. Log out
In useful files you will be able to find our arduino pdf book, eagle pcb installer and a lot of another useful things.

And of course! Chat! You can write messages! It is awesome!

Some information about my program:
  • c0ded by Kirill (11moon11) 2013
  • c0d3d on C++
  • 1224 lines of code
  • I spent 17 hours to create this program (it is only for v1.0, now you are able to download v1.6)

Thursday, October 10, 2013

My binary timer

    You will need:

  • 12 LEDs
  • Computer
  • Arduino compiler
  • Arduino cable
  • Alot of wires
Here it is my schematic:
And of course my sketch:
///////////////////////////////////////////////////////////
//              c0d3d by Kirill Kozlov 2013              //
//            Binary clock (Robatics lessons)            //
///////////////////////////////////////////////////////////
//                 v0.2 - Fully workable                 //
///////////////////////////////////////////////////////////
int led13 = 0;
int led12 = 0;
int led11 = 0;
int led10 = 0;
int led9 = 0;
int led8 = 0;

int led7 = 0;
int led6 = 0;
int led5 = 0;
int led4 = 0;
int led3 = 0;
int led2 = 0;

int secondsleft = 0;
int minutesleft = 0;

void setup()
{
  pinMode(13, OUTPUT);
  pinMode(12, OUTPUT);
  pinMode(11, OUTPUT);
  pinMode(10, OUTPUT);
  pinMode(9, OUTPUT);
  pinMode(8, OUTPUT);
  pinMode(7, OUTPUT);
  pinMode(6, OUTPUT);
  pinMode(5, OUTPUT);
  pinMode(4, OUTPUT);
  pinMode(3, OUTPUT);
  pinMode(2, OUTPUT);
}

void loop()
{
  if(led8 == 0)
  {
    digitalWrite(8, HIGH);
    led8 = 1;
    goto secend;
  }
  else
  {
    digitalWrite(8, LOW);
    led8 = 0;
  }

  if(led9 == 0)
  {
    digitalWrite(9, HIGH);
    led9 = 1;
    goto secend;
  }
  else
  {
    digitalWrite(9, LOW);
    led9 = 0;
  }
  
  if(led10 == 0)
  {
    digitalWrite(10, HIGH);
    led10 = 1;
    goto secend;
  }
  else
  {
    digitalWrite(10, LOW);
    led10 = 0;
  }
  
  if(led11 == 0)
  {
    digitalWrite(11, HIGH);
    led11 = 1;
    goto secend;
  }
  else
  {
    digitalWrite(11, LOW);
    led11 = 0;
  }
  
  if(led12 == 0)
  {
    digitalWrite(12, HIGH);
    led12 = 1;
    goto secend;
  }
  else
  {
    digitalWrite(12, LOW);
    led12 = 0;
  }

  if(led13 == 0)
  {
    digitalWrite(13, HIGH);
    led13 = 1;
    goto secend;
  }
  else
  {
    digitalWrite(13, LOW);
    led13 = 0;
  }

  secend:
  secondsleft++;

  if(secondsleft == 60)
  {
    minutesleft++;
    secondsleft = 0;

    digitalWrite(13, LOW);
    digitalWrite(12, LOW);
    digitalWrite(11, LOW);
    digitalWrite(10, LOW);
    digitalWrite(9, LOW);
    digitalWrite(8, LOW);

    led13 = 0;
    led12 = 0;
    led11 = 0;
    led10 = 0;
    led9 = 0;
    led8 = 0;

    if(led2 == 0)
    {
      digitalWrite(2, HIGH);
      led2 = 1;
      goto minend;
    }
    else
    {
      digitalWrite(2, LOW);
      led2 = 0;
    }

    if(led3 == 0)
    {
      digitalWrite(3, HIGH);
      led3 = 1;
      goto minend;
    }
    else
    {
      digitalWrite(3, LOW);
      led3 = 0;
    }

    if(led4 == 0)
    {
      digitalWrite(4, HIGH);
      led4 = 1;
      goto minend;
    }
    else
    {
      digitalWrite(4, LOW);
      led4 = 0;
    }

    if(led5 == 0)
    {  
      digitalWrite(5, HIGH);
      led5 = 1;
      goto minend;
    }
    else
    {
      digitalWrite(5, LOW);
      led5 = 0;
    }

    if(led6 == 0)
    {
      digitalWrite(6, HIGH);
      led6 = 0;
      goto minend;
    }
    else
    {
      digitalWrite(6, LOW);
      led6 = 0;
    }

    if(led7 == 0)
    {  
      digitalWrite(7, HIGH);
      led7 = 0;
      goto minend;
    }
    else
    {
      digitalWrite(7, LOW);
      led7 = 0;
    }
  }

  minend:

  if(minutesleft == 60)
  {
    minutesleft = 0;
    secondsleft = 0;

    digitalWrite(13, LOW);
    digitalWrite(12, LOW);
    digitalWrite(11, LOW);
    digitalWrite(10, LOW);
    digitalWrite(9, LOW);
    digitalWrite(8, LOW);

    digitalWrite(7, LOW);
    digitalWrite(6, LOW);
    digitalWrite(5, LOW);
    digitalWrite(4, LOW);
    digitalWrite(3, LOW);
    digitalWrite(2, LOW);

    led13 = 0;
    led12 = 0;
    led11 = 0;
    led10 = 0;
    led9 = 0;
    led8 = 0;
    led7 = 0;
    led6 = 0;
    led5 = 0;
    led4 = 0;
    led3 = 0;
    led2 = 0;
  }

  delay(1000);
}
Upload and enjoy!

Wednesday, October 2, 2013

TED speaker about Arduino

    On our lesson we have seen a video, where TED speaker speaks about Arduino possibilities. I like to watch TED speakers presentations, because their speach is very clear and informative. You can study alot of new, watching this videos. Below you can find this video.

Thursday, September 26, 2013

Second project (Advanced LED program)

    Well, today i will show you how to create advanced LED program!


    You need:
        1) Arduino board.
        2) Bread board.
        3) Wires.
        4) LED(s).
        5) Computer.
        6) Arduino compiler.
        7) USB cable to upload your code on arduino board.

    Well, let's start with schematics below. I've done it by myself, it will explain you how to connect all components together:
I marked wires with green color. And LED(s) with yellow. One very meaningful thing: LEDs have got short and long wires! You need to connect GND to the short one, and digital pin(s) to the long one!

   After you have connected all components you need to write a code, which your arduino board will execute. So, let's do it!

#define LED1 13 //LED connected to digital pin 13
//if you have more than one LED,
// you need to declare and initialize another variables
#define LED2 12 //LED connected to digital
#define LED3 11 //LED connected to digital pin 11

void setup() //setup function
{
pinMode(LED1, OUTPUT); //set the digital pin as output
       //for first LED
  
//if you have more than one LED,
        // you need to set another digital pins as output

pinMode(LED2, OUTPUT); //set the digital pin as output
       //for second LED
  
pinMode(LED3, OUTPUT); //set the digital pin as output
       //for third LED
}

void loop() //loop function
{
digitalWrite(LED1, HIGH); //turns our first LED on
delay(1000); //waits for a second

//if you have more than one LED,
//you need to write a code for another LED(s)

digitalWrite(LED1, LOW); //turns our first LED off
digitalWrite(LED2, HIGH); //turns our second LED on
delay(1000); //waits for a second

digitalWrite(LED2, LOW); //turns our second LED off
digitalWrite(LED3, HIGH); //turns our third LED on
delay(1000); //waits for a second

digitalWrite(LED3, LOW); //turns our third LED off

}


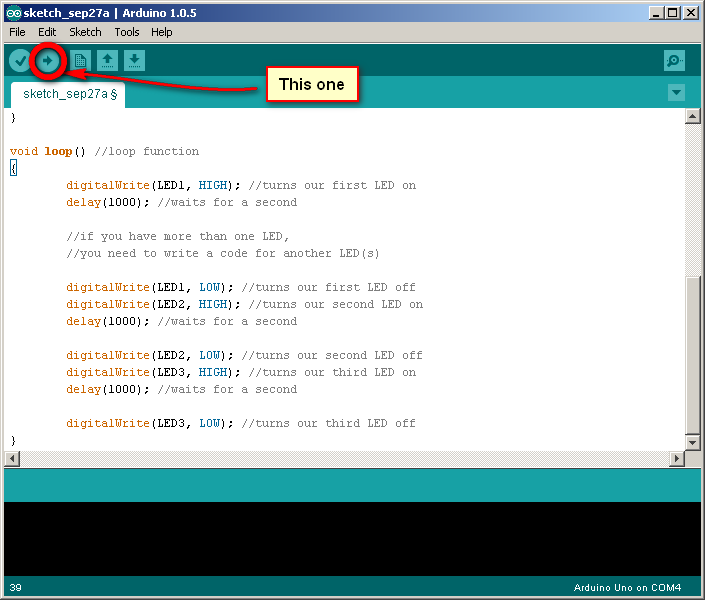
Well, now we need to upload our code and that's it! To do it you need to connect you arduino board to your computer and press upload button, which you can see on the screenshot below.

    If you have got some questions, don't be shy - write comments!

Tuesday, September 24, 2013

Alot of usefull information

    I have found alot of web sites and links with very usefull information. Full descriptions, meanings and symbols of all components, which we will use you can find here. I like this web site, because you can find alot of information. To find it you jast need to press on the component name label (Wikipedia page will open on a new tab). Example you can see on the screenshot below.

    Also i have found very good circuit simulator. Unfortunately it is not free, but you can try in online for free! And you can save your project on your account and then download it! To try it online you jast need to pess this button: 

    Now some information about wires. We have got two tipes of wires:
        With one metalic wire inside.
        With more than one metalic wires inside.

    On our last lesson to create a circuit we used first type of wires. My group and i made "SOS signal lamp".

    SCR(source code) of my programm i will publish later. =)

Wednesday, September 18, 2013

My first Arduino programm!

     It was very interesting to try to create a programm, because when you start to create something you can understand that you can code everything you want! I'm not very good at Arduino programming language yet, but i belive that one day i will code something very usefull and smart.

Some usefull information:

Source code of my first programm:

void setup()
{
    pinMode(13, OUTPUT); // set digital pin 13 to output
}

void loop()
{
    digitalWrite(13, HIGH); //turn light on
    delay(500) //wait 0.5 seconds
    digitalWrite(13, LOW); //turn light off
    delay(1000) //wait 1 second
}